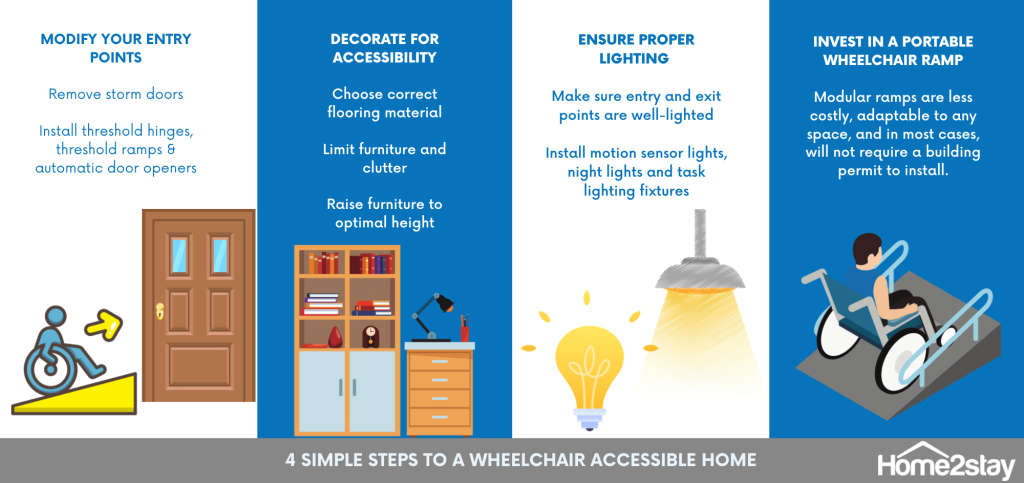
4 Simple Steps to a Wheelchair Accessible Home

If you or someone in your home uses a wheelchair, you need to make some changes to your space to make it easy to move around.
While the obvious options are renovating areas such as doorways and hallways inside your home, entry and exit points; and installing equipment such as wheelchair ramps, stair lifts, and patient lifts- There are other simple and cost-effective steps you can take to help wheelchair users access all areas of your house conveniently.
First, let’s look at how much clearance space wheelchair users need to be able to move around easily and safely:
Wheelchair turn radiuses refer to the circular space that permits a wheelchair to make a 180 or 360-degree turn. The Americans with Disabilities Act (ADA) requires the following measurements:
Updated on March 17, 2022
- A circular space with a minimum of 60 inches diameter for a wheelchair to make a 180-degree or 360-degree turn.
- In case the above is not possible, a T-shaped turning space is also allowed: This should have a 3-point turn with a minimum of 60-inch square with arms and a 36-inch wide base.
- A portion of the ‘circular space’ or T-shaped turning space may be located under countertops, shelves, lavatories or other accessories, and required knee and toe clearance must be indicated.
Before installing costly equipment and making big home accessibility renovations, you can start with four practical steps in making your home more wheelchair-friendly.
1. Modify your entry points
Standard home entrances pose a lot of challenges for wheelchair users, including multiple doors, a threshold, and narrow door frames. It’s a matter of knowing which elements you need and which ones you can remove.
- Remove: Storm Door
It can be extremely difficult to hold open one door, while you reach into the doorway to open the interior door and at the same time propel yourself over a threshold- all from a seated position. Removing your storm/weather door will remove one more obstacle out of your path.
- Install: Threshold Hinges
Threshold hinges on your interior door allow you more room to enter the house in your wheelchair.
With regular door hinges, the open door remains within the path of the doorway, giving you less room to move, which is especially challenging if you are using a manual chair and need to propel forward by placing your hands on the OUTSIDE of the wheels of your chair.
Offset hinges, on the other hand, allow the door to swing completely OUT of the doorway’s opening, widening it by up to 2” without the need to remodel your entire door frame. While this may not seem like a lot, the difference is definitely noticeable when trying to enter the house in a wheelchair or other mobility aid.
- Install: Threshold Ramp
Consider investing in a threshold ramp to tackle the weather strip at the front door.
Rubber threshold ramps by Pride Mobility meet ADA slope requirements, and come with 0.5” increments. They can easily be installed in any standard doorway, and provide a total of 36” of usable space.
- Install: Automatic Door Opener
While automatic door openers can range in price up to $2500, they are a great investment when preparing a wheelchair-accessible home.
Units such as the Record 6100 open, hold, and close the door for you, with features like programmable hold times to allow you enough time to enter. They can easily be installed on all types of doors, and can be activated by a handheld remote that can be attached to a wheelchair.

2. Decorate for accessibility
While we all like our homes to be beautifully and stylishly decorated, some of the items and materials we use may not always be practical for a wheelchair user.
- Your choice of flooring material is very important when you have wheelchair users in your home. Hard surfaces, such as laminated wood or asphalt tiles, are the easiest for manual wheelchair users to propel over and also generally require less power from wheelchairs.
Carpeted floors, however, are notoriously difficult for wheelchair users, and should be avoided wherever possible. Hence, avoid placing rugs and carpets in areas that receive a lot of traffic, such as hallways, walkways, and entrances into rooms.
Pay attention to where you place your floor mats- because they can get caught under the wheel or between the wheel spokes of the wheelchair or mobility device, making it hard for the user to move. Leave a clear floor path through your living, dining and bathrooms, and all areas in your home that serve as ‘wheelchair turn radiuses’.
If you still want to place a floor mat or rug, choose one made up of a thin material.
- Place your furniture in such a way that gives the wheelchair user enough space to freely and comfortably move around the house. Cluttering your space with furniture might cause unnecessary difficulties and accident risks, not only for wheelchair users, but also for everyone in your household.
Start with the hallways and entrances and work your way into individual rooms to check for furniture or items that may be blocking the path of wheelchairs.
Same as with your floor, pay special attention to the circular space or T-shaped areas which wheelchair users use to turn and make sure that they are free of any furniture or other obstructions.
- Consider raising some of your pieces of furniture such as tables, desks, and dressing tables using bed raisers. This will boost the height of the surface, making it more comfortable for wheelchair users to perform daily tasks such as eating dinner, or working from the desk without hitting their knees on the surface.
Based on ADA guidelines, toe and knee clearance under surfaces must be 17 to 25 inches.
3. Ensure proper lighting
Proper lighting is very important in any space, especially when you are preparing your home for aging in place or there are people with disabilities living in your home.
According to the CNIB Foundation, half a million Canadians are estimated to live with significant vision loss. With our increasing dependence on technology such as smartphones and laptops, it is becoming increasingly common for people to lose their sight as they get older.
Fortunately, there are many simple and cost-effective lighting solutions you can install in and around your home today that will make it easier, safer, and more comfortable to age in your own home.
- Motion sensor lighting fixtures are probably the most suitable for wheelchair users. They can be installed both indoors and outdoors, and are automatically turned on when someone steps within the light’s radius.
- Make sure any entry and exit points to your home are well-lit, and it’s a good idea to equip them with two light bulbs, just in case one of them goes out. Your driveway or any walkway leading to your house from the street or your backyard should also be set up with proper lighting.
- Install night lights in the bedroom, bathroom, hallways, and any other areas that might get some traffic at night.
- Task lighting fixtures in cupboards, shelves, dressers, or any other storage areas can help you find things easily and safely.
4. Invest in a portable wheelchair ramp
Modular wheelchair ramps are a great alternative to more costly chair lifts, porch lifts or permanent wooden ramps, and can be used in a variety of situations. Most modular ramps come in different widths and can be built to the length you need:
- 26″ – Suitable for minivan use and more narrow chairs or walkers
- 30″ – Standard size suitable for most applications
- 36″ – For public applications or larger chairs
Roll-A-Ramp, one of the most popular modular ramps brands, features patented link construction, meaning you’ll never get stuck with the wrong size ramp- simply add additional links to change the length of your ramp with the simple tools provided.
Many families are opting for modular ramps, instead of permanent ones, as in most cases, you wouldn’t need a building permit to install them in your home.
Modifications to make your home more accessible and safer for everyone might sound intimidating at first. But in most cases, you can start with small, more affordable adjustments and installations, and make bigger purchases little by little, as needed.
If you are feeling overwhelmed, call in your local accessibility solutions experts for their recommendations.
Home2stay offers FREE ASSESSMENT (worth $150) in the British Columbia region. Contact us and let’s start making your space safer and more accessible for you and your family members!

Updated by Mia Brigette Chua on March 17, 2022
Mia Chua is an offshore team member of Home2stay, managing marketing, content creation and assisting with overall operations. Accessibility and inclusivity are global issues, and she has big dreams to someday bring what she learns from Home2stay to influence positive changes to her own country across the globe.
Prior to joining Home2stay, she worked in operations and marketing in the real estate and fast-moving consumer goods industries.
Her interests include picking up new skills, cooking and baking, health and wellness, technology and social issues.
Leave a Comment
We'd Love to Hear Your Thoughts Got something to say? We're all ears! Leave your comments below and let us know what you think. Your feedback helps us improve and serve you better. Can't wait to hear from you!